The Markup iceberg
Contents:
# Word and WYSIWYG editors
Most people use applications like Word and Google Docs for their writing needs. It is not hard to see why: they don’t have much in the way of a learning curve, and they can do pretty much all you need it to do. These editors are so-called “What You See Is What You Get” editors, and they were invented in the early 90s to make it easier for the average user to edit documents. As they are an integral part of most people’s work-life, they have clearly succeeded in this goal.
They are so ubiquitous, in fact, that most people can’t imagine many other ways of working with text. This is a shame, because the “Word” way of doing things has some disadvantages. The most important one is the amount of clicking. In Word, if you want to make a piece of text look like a title, you need to stop what you are doing, highlight the piece of text, click the “title” button, press enter and hope that your subsequent text looks normal. Another one is a major reason why I went looking for alternatives: Word and PowerPoint do not work on Linux, which is my preferred operating system. Yes, you can use Word Online, but that is one of the worst apps I use on a daily basis after Teams (something something Microsoft).
There are many more little annoyances, and I got fed up with them. This is when I decided to see how this can be done differently: I fell down the rabbit hole of Markdown, and I want to show you how many things can be replaced with a different paradigm: Markdown and front formatters.
# Top of the iceberg: Markdown as text
Many people are first introduced to Markdown by GitHub or some other developer-oriented tool. In these contexts, Markdown is mainly used to make some simple files like READMEs. Some other use-cases include GitHub Wikis and if you have worked with some of these kinds of text-first tools, you may have noticed how nice using Markdown is. It takes a bit of time to adjust, but it is quite intuitive and very readable as plain text. Yes, at first you forget some things like the markup for a link, but you eventually get the hang of it. When you do, you can type much faster. You can even use Markdown in a WYSIWYG editor, which is the best of both worlds: you see your changes, but you can still type fast.
You may think to yourself: “Why is this guy so enthusiastic about Markdown. Yes it is nice, but so far, I’ve seen nothing revolutionary” You are right. The power of Markdown is not in text alone.
# Level 2: Layout as configuration
Markdown on its own is not very reMarkable (see what I did there): the power comes when it is combined with a layout configuration. Explaining this idea is easier with some examples. Take this very blog post you are reading right now. It is written in Markdown and then taken by Zola to be rendered with a template. Three types of layout are used:
# Template level
The template layout is an HTML file. In this HTML file, I define how everything in and around the text should look. In the example, I have the text of a blog post which is made purple by the Tailwind class.
...
{{ page.content | safe }}
...
The Template is where everything that is unrelated to the text should be put: it shouldn’t matter what the text is. The things that do change should be defined in the:
# Frontformatter
Some things do change per text. In this case, front formatters can be used. Front formatters differ per use-case and app. The following front formatter is for this very blog post:
+++
= "The Markup iceberg"
= 2024-01-17
= false
[]
= ["software"]
= ["markdown", "productivity"]
[]
= "en"
+++
.
Like the name suggests, a front formatter is put in front of the text in the markdown file itself. In this case, we define things like the title, the categories etc. In the case of Zola, the values that are defined in the front formatter are used in the template like this:
{{ page.title }}
This allows the template to use some dynamic values while still being generic.
Zola is not the only one using this technique though: you can put just about anything in front formatters. Take this example from Marp, an app that allows you to make presentations with Markdown:
- -
An important other thing to note is that, because front formatters and templates work independently of the content, you can do a one-time set-up and never worry about your layout again. This exactly how I write these blog posts: I just write them, push them to Git, and voilà: they all look the same.
As you can see, the universality of a template and a front formatter means that many things that you would usually use productivity software for, can be done in Markdown: we have already replaced PowerPoint and WordPress. But how about Word?
# Level 3: Pandoc: more than a Word replacement
Pandoc is a library that converts one kind of document into another. This doesn’t sound very remarkable, but it does much more than just convert files. Pandoc takes everything I have just showed and takes it to the next level: it allows you to define the layout of an entire essay in a front formatter and then just start typing. Take this front formatter I used for an essay I wrote:
---
header-includes: |
  \usepackage{titlesec}
  \newcommand{\sectionbreak}{\clearpage}

title: "Hello Markdown"
author: "John Doe"
lang: nl
papersize: a4paper
geometry: margin=2cm
fontfamily: roboto
fontfamilyoptions: default
documentclass: extarticle
fontsize: 12pt
linestretch: 1.2
#Table of Contents
toc: true
toc-depth: 3
#Support for \ newline
from: 'markdown+escaped\_line\_breaks'
bibliography: 'citations.json'
---
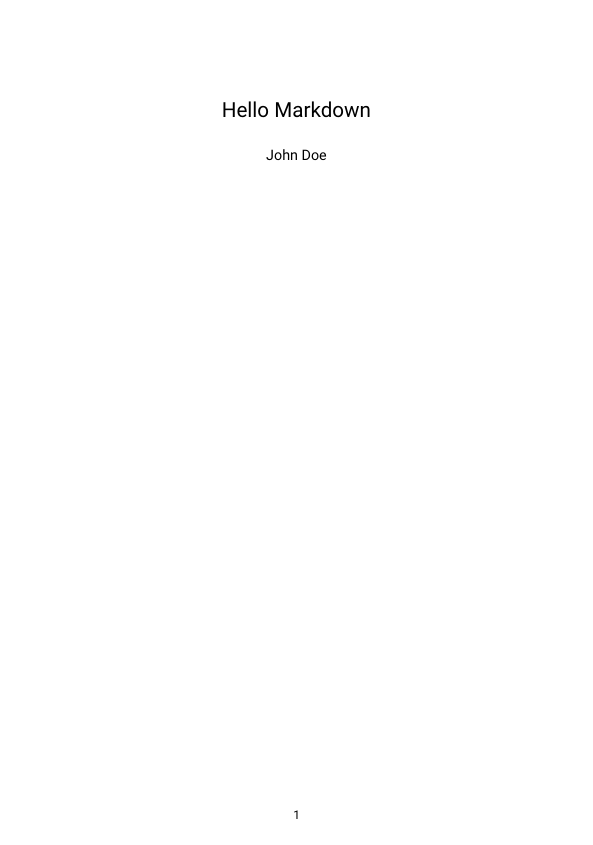
This YAML front formatter contains everything I need to tell Pandoc to make sure every essay I write looks exactly the same. Some things will look familiar: options like title, lang and fontfamily are quite self-explanatory. Some of these options might look a bit out of place, though, like the “header-includes” option. This is because this option uses
# Level 4: Latex: the mother of all markup
LaTeX is the mother of all typesetting languages. It is used widely in academia but largely unknown outside of it. That’s a shame, because it is very powerful. One reason why it might be less popular, is because its syntax is not very easy to read. Compare these two snippets of LaTeX and Pandoc Markdown:
% Starts an article
% Imports amsmath
\title % Title
\begin{document} % Begins a document
hello there
\newpage
\end{document}
As you can see, the separation between settings and content is very clear in the Pandoc Markdown, and the syntax is a lot more concise and easy to read. Pandoc Markdown also allows you to use snippets of LaTeX. This is very useful for the 5% of the time when you need to do something which you can’t do in Markdown, like start a new page. The result is still 95% readable Markdown, with some LaTeX commands here and there.
When using this setup, the pipeline is like this:
Pandoc Markdown → LaTeX → anything
This is useful to remember when you are debugging your front formatter: if LaTeX has an error, first look in your Front formatter/Pandoc. This anything can be a PDF document, for example.
# Markdown Everywhere
As you can see, between GitHub, Pandoc and Marp, you can do a lot you can do in Office, all using the same paradigm. You can do many more things, like have compiled code snippets with Rmarkdown. Working with Markdown everywhere has a few advantages:
- Define your layout once, use it for all subsequent documents
- Familiar syntax for very different applications
- Plain text: manipulate your files with any program that can work with plain text. Noboilerplate has a great video on this. An effect of having everything as plain-text is that you can use Git for your text with all the advantages that brings: easy collaborations, piggybacking of GitHub, and a complete history of everything.
Want to get started using Markdown? You can take my current set-ups as a springboard.
For presentations, you can use Marp with the front formatter that was shown previously. I would recommend using the CLI-tool with these flags: marp . --html --server --watch (I have aliased it). It enables real-time updates to your presentation, this set-up made the workflow for making presentations buttery smooth.
Essays are a bit more tricky. Like I discussed in the previous chapter, the combination of LaTeX and Pandoc is a bit finicky. As a starting point, you can use my template that I showed in chapter 4. Combine this with MiKTeX and the experience is relatively painless. While setting up MiKTeX, I did have some strange errors, but they went away when I updated MiKTeX in both administrator mode and user mode. After the updates, I recommend you to enable a “Just enough TeX” set-up. Once you have MiKTeX set-up, you can just hit “export” with XeLaTeX PDF, and it will compile. This will take a while because it installs the necessary packages on the fly, so have patience and keep an eye on the processes in task manager. The result should be a PDF file that is ready to share.
The way I made my blog with Zola is a topic all on its own, and I have written a blog post about it. For this post, the most relevant part is that I used GitHub actions and GitHub pages to deploy my site, but I could have used pretty much anything under the sun because of the simplicity of hosting a static-website-generator like Zola with Markdown.
Before I sign of, I want to mention Typst: I am very excited about the direction it is going, but it isn’t ready yet.
All in all, I think the time investment of working these systems out is well worth the advantages, but you might disagree: I’d love to hear what you think.
P.S: I was so focused on writing this I can’t remember what I listened too, but one of the albums was Pretzel Logic by the great Steely Dan.
Also, thank you to all the folks at Tildes for giving me very useful feedback about this post. Their constructive criticism is exactly why I prefer Tildes to Reddit.